Installation prep
At least a week before an installation is scheduled, check that the installation kit and equipment/supplies on hand are sufficient. Check the Installation Kit list to ensure all items are on-hand and have been replenished as needed. Maintain an inventory spreadsheet of the materials in the install kit and update this during the check. If possible, check logger function several days prior to installation. Bring at least one back-up logger just in case.
WIBL
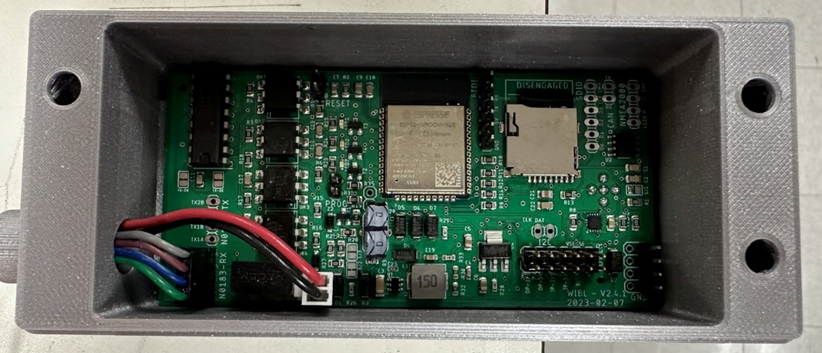
The silk-screen on the logger boards also indicates the polarity of the cables. A blob of hot-glue on the connectors after you install them is recommended. If they are installed, just make sure they don't come loose in service.
Remember that if you want to connect to the logger to update the firmware, you'll need a USB to serial converter that provides 5V power and 3.3V logic: this is not universal (if you feed the logger with 5V data, you'll likely destroy it).
The current converter used is an Adafruit FTDI Friend. Looking at the board from the component side, it plugs into the pin header to the right of the microcontroller, with its components facing to the right (check the silk-screen on WIBL and converter to confirm GND pin position).
Check that the firmware is updated and flash it with the appropriate metadata. If the metadata is not preloaded onto the logger, it can be fixed during WIBL Data Processing. Instructions for updating the firmware and flashing the WIBLs can be found in the WIBL Installation Guide section and on CCOM's WIBL GitHub page.
Bring a laptop with you, if possible. Plan to let the WIBL run after installation, pull the SD card, and check for proper function. WIBL data are not human-readable, so to check if it’s properly recording, you’ll have to run it through the appropriate python scripts (see WIBL Data Processing for instructions).
Prior to the installation date, direct the participant to the Equipment Check webpage and have them confirm that their vessel is set up with a NMEA. To help plan for the installation, it may be helpful to request photos from the participant of the NMEA location within the center console.
After the installation is complete, the participant will need to handle the data hand-off. Send them a Box folder link (or another preferred file-sharing platform) and make sure that they can upload files to it. Ask them to wait to delete any items until you have downloaded them or transferred ownership to yourself.
Yacht Devices (YDVR)
If installing a YDVR, you will need to make sure the configuration file on the microSD card has the correct parameters specified. Open a text editor (e.g., Notepad) and copy the configuration below:
“CFGSAVE
NMEA2000=ON
FORMAT=DAT
AIS=OFF
DELETE=YES
AUDIO=OFF
COMPRESSION=OFF
GAIN=2.70
DELAY=30.0
FILTER=ON
THRESHOLD=2.50
PLAYER=OFF
LOOP=OFF
SILENT=OFF”
Save the file as YDVR.TXT to the root of the MicroSD card
After the installation is complete, the participant will need to handle the data hand-off. Send them a Box folder link (or another preferred file-sharing platform) and make sure that they can upload files to it. Ask them to wait to delete any items until you have downloaded them or transferred ownership to yourself.
Example YDVR configuration file:
# Voyage Recorder YDVR-04 (www.yachtd.com), serial number: 00000000
# Firmware version: 1.04 17/08/2018
# Settings in this file match the settings in device’s EEPROM
# SAVE TO EEPROM
# To save settings, rename this file to YDVR.TXT and remove # symbol
# from the line below
CFGSAVE
# NMEA 2000 RECORDING
NMEA2000=ON
FORMAT=DAT
AIS=OFF
DELETE=YES
IGNOREPGN=
IGNOREADDR=
IGNORE=
SPEED=250K
SILENT=OFF
# AUDIO RECORDING
AUDIO=OFF
COMPRESSION=OFF
GAIN=2.70
DELAY=30.0
FILTER=ON
THRESHOLD=2.50
# PLAYER MODE (disables recording when ON)
PLAYER=OFF
LOOP=OFF
# End of file
OFM Mussel Kit
Make sure to contact Orange Force Marine with the date/time of the installation in case their support is needed. They can also check to ensure the logger is online, connected to the cloud environment, uploading data properly, and collecting valid depth and position data.
Installation day requirements:
- OFM Mussel Kit data logger (plus backup(s))
- Installation kit
- Camera
- Cell phone (for contact with OFM in real-time for installation assistance, or for using a hotspot)
- 1-2 people (2 is best for metadata offset measurements, especially if you haven't done many installations previously)
During installation, take pictures and videos of logger identification numbers, logger orientation, installation locations onboard the vessel, wiring configurations, and antenna placement. Photos can be useful for social media and marketing and also provide a visual reference for offset directions and relative positions of GPS and transducers.